 |
| Manufacturers |
| Me List |
| Me 262 Variants |
| Me P.1104 |
| Me P.1106 |
| Me P.1109 |
| Me P.1110 |
| Me P.1111 |
| Me P.1112 |
| Me P.1114 |
| Me Schwalbe |
| Me Zerstrorer PII |
| Home |
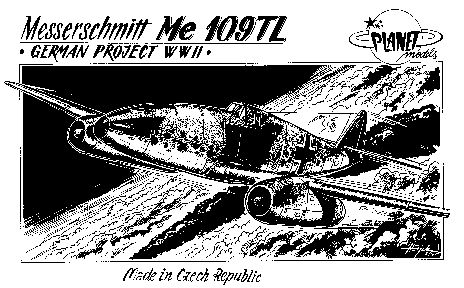
Me 155 Body (Me 109 development ) with Me 262 wings and engines . Needs a nose weight , hole to grind yourself. Basic cockpit - use Me 109/262 detail sets , filler on all joints and roof on wheel wells necessary , very average canopy - use Me 109G canopy from Squadron/Falcon. Accuracy good. Good but very delicate Propagteam decals - slide on , no tweezers. Another good Planet kit.
Messerschmitt Me 109TL, ???AUD from NKR Models Wulf Corbett U.K.
A 109 fuselage with tricycle undercarriage, a new nose and an extended, straight, wing with 2 underwing jets like the 262. Looks good, very like many other early jet designs, with a strange feeling of familiarity from the distinctive tail. 28 resin parts, 1 vacform canopy, decals and instructions included.
Instructions perfectly good (camo scheme in RLM 75/81 with undersides in 76 suggested). Decals include standard crosses, number '13's, and TINY little 'halved' swastikas which, interestingly, had been hand-cut off my sheet then included anyway...
The parts are just as well sculpted as the P 1110/II, but need more cleaning up before initial assembly. Cockpit has seat, stick, panel and floor, while undercarriage doors will need patience to cut & reposition to assemble open (perfectly clearly marked to assist though - just a complex arrangement). You have to supply your own pitot this time though - shame! :)
Wings are moulded in one piece, which helps enormously, but the jet nacelles will take a bit of care to line up accurately, there being, of course, no locating pins. Take a bit of time and make up your own tabs from plasticard or scraps. Nose weight is probably needed, there is room, but not far forward of the cockpit.
A good resin kit, better than most, and wouldn't put a first-time buyer off. Very nice look to it too, just needs more work than the P 1110/II.
Airmodel - Resin
Wulf Corbett
Boxed as usual, with components separated into small sealed bags (about a dozen of them!), including some metal bits and a pair of vac canopies. Resin is, as usual, a yellow-cream, with extremely fine engraved lines, extremely sharp trailing edges, extremely thin cockpit sides... etc. It looks superb!
The fuselage is, as I've suggested, hollow, so if the metal nosewheel & leg isn't enough, there's room for weight to avoid tailsitting. No immediately visible flaws, except some staining that looks like superglue - could be something to do with the resin casting? - on the inside of some parts.
Metal legs, wheels and jet cones are very clean, and the cockpit has sidewall detail, panel (looks good), seat and stick. Wheel wells are too shallow, but that's acceptable I guess. Wings are in 3 bits, outers and an underside centre section with the wheel well holes. Just found some bubbles on the inside of the jet nacelle parts, but they don't reach the outside, so should be OK so long as I don't need to sand the joint down much!
There are no decals, but the instructions include a painting guide (with a diamond shape identified as 'Swastika', so the WORD is still OK...) and history.
Nice.Unicraft - Resin
William Moore

This is a conversion for the front end of a 109 to replace the piston engine with a jet . This is an extreme flight of fancy as this was never even contemplated . Igor from Unicraft readily admits this but it certainly looks strange . I have not seen the conversion as yet.
I'm only going to cover the more recent releases in rough chronological order of release.
This is a reasonable kit that is good for conversions but with the cheapness of the Revell offering this kit is now less desirable As Frank Henriquez reminds me JoHan also did a 262 but this is now history only. Airmodel also did a vacform conversion but I am unsure whether this is still available and what versions it covered - this is according to John Clarke based on the Matchbox kit.

MPM has made a fortune from producing a whole series of variants based on the standard Me262 . The moulds are of average quality and fit but are the only serious attempt on the market to do a series . Some of the smaller manufacturers have filled others of these gaps. According to Radu the body is based on the Hasegawa mould although I'm not sure if the wings might be from the Heller kit. Personally I find the fit very average particularly around the wing/engine and wing / body areas . These areas are notoriously difficult on this plane and I found a lot of fiddling was required to get a decent fit followed by filler. Having said all that, at the moment they're the best available - while they still are. As the kits were limited run injection moulded they are no longer being produced . As of May 98 they were still available from places like Squadron and some Hobby stores but the supply will dry up soon and then it'll be only places like King kit in the UK who do secondhand kits who'll have them.
|
|
|
|
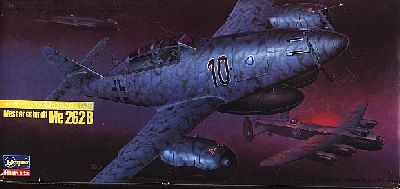 |
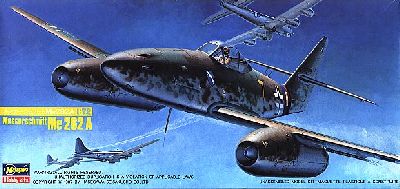


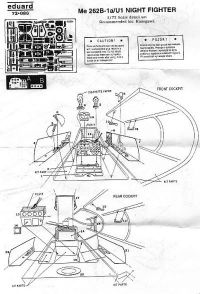
Until recently this was the only decentish kit available . Retailing for $20 AUD it was a good but bit expensive kit if you wanted to do a lot of variants . They produced the standard A-1a single seat fighter ( with 24 R4M's ) and the A-2a being the bomber version as one kit and the 2 seat B-1a trainer and B-1a/U1 night fighter as the other . To my eye it's a reasonably good kit but the experts may disagree. Hasegawa got more mileage out of the A version by issuing two further versions with Kommando Nowotny markings and JV-44 "Galland."
At this point I should mention that Revell does a 1/144 scale Me 262 and a right bugger it is. Really bad fit that makes you think no one was ever meant to assemble it.
The 1/72 kit at just $7 AUD is an absolute bargain , the only
review
I've seen says it's quite good with
the usual few quibbles (Military in Scale.) Certainly worth
buying
if you want to do lots of
versions. They are also doing a A and a B version . I suspect without
having seen the kit that they
will do exactly the same as Hasegawa in offering the A-2a with the A-1a
and both the night
fighter and trainer in the B version. Interestingly the Monogram
version (same kit , same group -
Revell/Monogram , but different boxtop and instructions) retails here
in Oz for $27. This is fairly
equivalent to the price Squadron is now charging in the U.S.
Revell 1/72
Andres Valdre
Kits of Me 262. Me 262 is one of the most popular German WWII aircraft modelling subjects (and most popular of early jets). According to my database of German WWII aircraft model kits (which includes now data about 2,000 kits, 400 decal sheets and 800 detail or conversion sets), there are about 89 kits, at least 18 decal sheets and at least 41 detail/conversion sets produced or announced about the Me 262.
First impressions of the Revell 1997 kit. The quality of the kit seemed impressive, though slightly lower than that of the Bv P.194 of the same manufacturer. The quality was, still, very good and the fit was excellent. There were a few injection and sink marks, and narrow flash on some parts.
The kit parts' breakout allows to suggest that reconnaissance and two-seat versions of the basic kits are on their way (the two-seat nightfighter version should be out already). The kit contains some parts which are not used for the fighter version, like drop tanks (with the Wikingsschiffe pods) or camera port windows. The kit includes two launch tubes of WGr 21 21-centimetre tube-launched rockets (for a test machine in III/JG 7) which went to my spares' box.
The kit has beautiful detail, in some cases even exceeding what is needed - the detail for the underside of the cockpit tube (!) will certainly not be seen, and the elaborate engraved panel lines will be lost as well - all German WWII jets appear to have had their panel lines puttied smooth. (Here a large percent of fellow modellers would protest, but my personal opinion is that the panel lines of WWII German jets should be puttied over as well, for realism's sake.) However, in the course of building the kit, I retained the beautiful (if not a hint too wide) panel lines.
Building the model. It is possible to start building the model by joining fuselage halves, as the cockpit tub and nose weight can be inserted from below. After some time it is possible to sand/fill the seam - not much is needed.
Cockpit. I painted the cockpit and instrument panel RLM 66 dark grey (using Humbrol paint No. 32) which was the standard for late-war cockpits, with black (Hu.33) instrument faces. After the black paint had well dried, I picked out the moulded-in instrument detail with a sharp soft white pencil (I don't recall it well; it might have been that I drybrushed the instrument faces with white paint). After this, drops of 5-minute araldite were added to instruments as realistic-looking "glass". (Here one should be careful not to smudge the white pencilmarks while making the "glass"!) I painted the various instrument panels at the side consoles also matt black and highlighted the numerous knobs and buttons with drybrushing Aluminium (Hu.56) and White (Revell 04). There are colour photos of the cockpits of restored Me 262's available, e.g. in "German Aircraft Interiors Vol. 1" and "Deutsche Oldtimer Flugzeuge" which make great references. I painted the seatbelts (moulded in with the seat) khaki (Hu.110 Natural Wood - well, the paint does not look like wood to me...) and drybrushed the buckles with Aluminium (Hu.56).
After this I inserted the complete cockpit tube in the fuselage. Now also the opening for the rear seat should be closed with part #10.
Nose weight. There is not much space for it, but after the parts #8 (fuselage skinning around the nosewheel) and #9 (nosewheel bay) are cemented together, weight can be put around the nosewheel bay. I used tin for the weight, don't forget to dry-fit the parts before you cement the nosewheel bay assembly to the fuselage.
Wings. To get a better result, it is often advisable first to cement the lower half of the wing to the fuselage of the low-wing aircraft model, and only after this add the upper halves. This is not absolutely necessary with this model, as the fit is good.
Engines. The assembly of the engines is simple (each consists of four parts: two halves of engine cowling, the "onion" and inlet), but some care should be used for aligning the "onion" at the outlets. It is also advisable to paint the interior of the engine dark, as a torch-equipped curious person would see inside it along the perimeter of the "onion". Don't also confuse the inlets of the right and left engines - follow the instructions. The instructions suggest that the inside of the inlet should be painted Mouse Grey (the same shade they suggest for the cockpit), but I painted mine Aluminium - this allows you to see the intake blades). Don't also forget to paint the hole at the middle of the inlet cone dark - it was the hole where the handle of the mechanical starter was found.
A little filler is needed to smooth the wing-engine seam after the engines are cemented in place. ( No surprise on a 262 kit - William )
Rest of the airframe. I filled the hole at the nose of the aircraft with 5-minute epoxy - it was the opening for the gun camera and I assumed it was glass-covered - or then the epoxy represents the camera lens.
The tailplanes should be also added now. No filler required.
Undercarriage. Well, I don't remember any problems with the nosewheel, but the main undercarriage members are a hint too long. The oleos look like they are uncompressed. A perfectionist would correct this, otherwise the model will sit too high on the ground. (See the photo below and compare it to photos of real Me 262's.)
The tyres have moulded-in patterns (a hint too heavy, but still). The mainwheel doors have to be cut in three parts and the nosewheel door in two when you intend to show them open (i.e. undercariage down). The doors are too thick (but I've seen worse).
Small details. The small details (D/F loop, pitot, aerials) are out of scale or not round where they should be. I measured the diameter of the pitot and it was 43 scale millimetres (1.7") - sure it was thinner! I replaced the pitot with a piece of 0.25 mm wire. The D/F loop is too thick and has a disturbing mould line - thinned mine with round file. The aerial which goes under the wing middle section also needs thinning.
Not all my references agreed about the aerial below the tail, so I left it off (I'm not very competent in Me 262's; the kit's part for this aerial looked like a short stick). Anyway, if you think it should be there, replace it with thinner wire.
The canopy was attached with Humbrol Klearfix - after the front end of the rear cockpit cover was also painted RLM 66 (Hu.32) and a scratchbuilt gunsight was added (incl. a piece of 0.13 mm clear sheet). In real life, the gunsight of the Me 262 could be folded out of way during landing, so a not folded gunsight doesn't agree completely with facts, but it certainly looks better than the folded one. The canopy is a little too thick, but what can I do about that...
I seem to have forgotten the aerial wire as well... It ran from the top of the canopy to the top of the fin, and for the 1/72 model, it should be made from a thin fishing line or any other material of your taste.
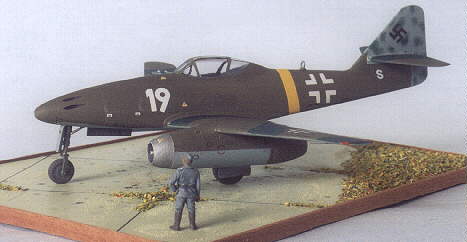
Finishing. The kit instructions show two painting versions: "White 19" from III/EJG 2 (with the Kommando Nowotny band), based at Lechfeld in December 1944, and "Blue 3" with the WGr 21 rockets, belonging to the III/JG 7 and also based at Lechfeld, but in March 1945. The painting scheme of the first one is discussed below (as I built that one), the latter is suggested to have a flowing-line interpretation of the standard painting scheme on the wing (RLM 81/82), RLM 76 undersides, nd RLM 82 streaks on RLM 76 on sides. This version also includes a RLM 24 Blue nosecone, a Reichsverteidigung band (the colours for JG 7 were blue-red) with a vertical bar for III Gruppe on it, a small number 3 (blue with white outline), a chevron marking and JG 7 greyhound badges.
Painting. I chose the other version, the aircraft from Kdo. Nowotny. I painted the undersurfaces and fin RLM 76 (Hu.175 - this paint is out of production now, and my precious tinlet dried up during painting the Me 262 :-(
The instructions suggest to paint the complete fuselage RLM 81 (I used Hu.155) - but on second thoughts (which ocurred, of course, only after the model was completed) it seems from the photos taken at Lechfeld and featuring the White 19 that the fuselage was still two-tone - there seem to be slightly lighter shade here and there. (RLM 70/71?? RLM 83/74??)
The wings were painted in RLM 81/82 in a pattern which looked quite similar to the standard one. I used Hu.149 Dark Green for the RLM 82 - and that is were I made a mistake - the RLM 82 should have been lighter than RLM 81, but Hu.155 is certainly much lighter than Hu.149... The more correct paint for RLM 82 should have been Hu.131 Light Green. I used masking tape for straight paint lines, but did not bother about soft paint edges (it is possible to do with a paintbrush - using the drybrush technique).
Smaller painting areas: fin got diffuse spots of RLM 82, using the photos of the real White 19 as reference for the port side); engine nacelles - top half and outlet area RLM 81 (maybe outlets were Black?); inlets Aluminium (Hu.56); undercarriage struts, inside of u/c doors and bays - RLM 02 (Hu.92); oleos Silver (Hu.11 - well, they were in fact from aluminium, but polished and often cleaned); tyres Chocolate Brown (Hu.98 - the situation with raw materials were bad in 1944...); gun ports matt Black (Hu.33 - should be deepened with a drill bit); "onions" Gunmetal (Hu.53); navigation lights White (tail), Red and Green.
Cockpit frames were painted first with RLM 66 (Hu.32) and after that with RLM 81 (Hu.155).
Decals. The areas where decals would go were given several coats of acrylic floor "wax" (I use Johnson's "Clean & Polish" which should be more or less the same product as their "Future", at least it works the same). I used a Q-tip to avoid running.
The kit's decals were used (except swastikas (300 scale mm, black without outlines) which came from an aftermarket sheet by Xtradecal). Revell's decals have greatly improved in recent years. I used Humbrol Decal Set 1 and 2 solutions for decal wetting and conforming to surface. There was no need to remove the clear film.
The decals were sealed with more floor "wax", then the whole model was dullcoated (Hu.49; two coats - results a smoother finish). On port side, the flare ports (one of which lays over the fuselage cross) were painted Matt Black.
Weathering. Matt black (Hu.33) was drybrushed around
exhausts
and cannon ports (note - smokeless gunpowder was used in WWII,
so
only a small area around the ports darkened). Metallic Aluminium
(Hu.56)
was drybrushed at walk areas, latches, steps, edges of hatches and
cowlings
etc. Some Burnt Umber watercolour (using decal softening solution as
carrier
for the panel lines.
This section follows the order generally established in most books on the subject starting with the V-series planes ( pre production and experimental.)
Me 262 V1,V2,V3
High Planes - Limited Run Injection moulded
William Moore
The first three experimental planes differ from the production planes in a few areas .
U/c - tail wheel not nose , different canopy , different leading edge between engines and body and different powerplants.
These two new kits fill a long standing gap . I imagine the kits will be based on an earlier kit like the Hasegawa and refined by this company if their Me 110G is anything to go by. These are definitely LIMITED run kits . This means large sprue gates and a degree of flash as well as more work required for a good fit . They are roughly comparable to MPM's earlier kits so exercise patience . I always imagine him sitting in a shed with a large clanking machine slowly turning out these kits in a scene reminiscent of early Industrial England or maybe that's just the drugs .
The V1 is in it's earliest incarnation only equipped with a Jumo 210G then later 2 BMW P.3302 jets were added followed later by full BMW003's. The V3 had a larger tail and the Jumo 004's which were larger and later added to the V1 also. The V2 incorporated other minor changes as it was the third to fly. All of these were fiddled with over time as part of the test programme.
The two kits cover much of this variation so I would recommend buying at least 1 of each if you want to show the changes.
I hope to have a full review later.
This is HighPlanes own site "Kit No 72038 takes us to Germany in 1942, and provides the first ever full kit (as opposed to vacform conversions) of the Messerschmitt Me 262V-1. Differing considerably from the production aircraft, the V-1 initially flew with just a piston engine in the nose, later also being fitted with two turbo jets to make a "trimotor". Both options are available in the kit. Another major difference between the prototypes and production aircraft was the use of a tail wheel arrangement on the former machines. Decals are provided for just the first aircraft, and the kit costs $26.00."
and again for the V2/V3 "72042 is for the second and third prototypes of the Me 262. These two aircraft were fitted with turbo jets from the beginning, but still featured the tail wheel undercarriage and cut back inner wing leading edges, along with a myriad of other changes to later machines. Cost is $24.00."
High Planes
Wulf Corbett
 |
 |
Covering the first (nose prop only) and later (prop plus wing jets) appearances of the 262's first prototype (both tail-sitters), in High Plane's usual somewhat garish pale blue plastic, on 3 sprues, plus 3 metal u/c legs and a vac canopy, first impressions of this are...
keep chanting the mantra... 'it's better than Unicraft... it's better than Unicraft...'...
however, on closer inspection, it IS better - MUCH better! Surface detail, lots of it, is very well and finely etched, trailing edges are very thin and sharp (the one-piece underwing is remarkably thin in fact), and the instrument panel is very nice indeed. There are two sets of wing upper surfaces, with and without the fairings for the jets. Injection gates are well thought-out, attaching to glueing surfaces in the main. The decals, although simple crosses and prototype codes, look sharp and clear, and include a pair of quite blatant swastikas.
All is not, however unblemished. A thin, fine, layer of flash surrounds almost every part, those well-positioned injection gates are numerous and quite thick, and the plastic seems a bit soft to work (an untested opinion). The pilot's seat is unusable and massive, more like a throne, and there is no joystick in the rather crude, bluntly (well, whatever the opposite of 'sharply' is in this case) mounded cockpit well. The nice thin wing is clearly warped too.
Instructions consist of a text construction explanation (an honest one too, with numerous references to 'cleaning up' parts, filing parts to shape, making your own joystick, etc.), plus an exploded diagram and scale plans.
Overall, a simple basic kit of a weird looking subject (without the wing jets, and with the nose prop it looks like either a Il-2 Sturmovik or a He 112, with possibly a bit of Stuka...). It certainly LOOKS accurate, once you get over the first impression, and would fare well from a bit of detailing. Contact High Planes at http://corryong.albury.net.au/~hiplanes/#AMPM
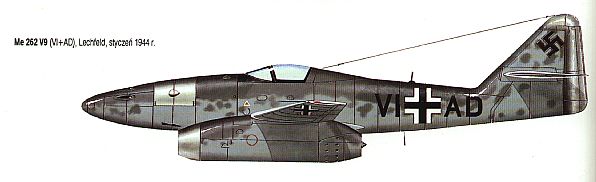
This kit is no longer as easily available though Squadron may be worth a try . This is the high speed or Rennkabine (Racing canopy) test version . As far as I know the only difference to a production version is the canopy .
I'll be honest and say I'm just buying this kit for the
canopy. I am
going to take the canopy off this
and add it to a Revell kit as it's gotta be easier than easier than
doing the MPM version and yes
that is lazy. I'm currently waiting on this from Squadron.
Unknown
Comments: MPM has been putting out limited run kits like crazy. They are known for Propagteam decals, Eduard brass and a vacuform canopy. Frankly, I'm not so crazy about all the brass, but I will admit that most of it can help add a lot to the kit.
This kit builds pretty well like a standard kit. The fit is not very good, but can be gotten around. For instance, there are huge gaps between the engine pods and the wings that must be filled with scrap plastic. Be sure to get the engines square!! The interior fits pretty well with some work and the instrument panel is a jewel. I found that several of the brass parts were a bit too big and interfered with others. The brass wheelwells are a real jewel, unfortunately they make it impossible to get a good wing/fuselge fit since the wells are too deep. This means crushing the wells and massive putty at the underside wing/fuselage joint. The fuselage is too wide for the wings and require the top fuselage/wing joint to be filed down until you get a good fit.
All the gear doors are brass as are the wheel centers, antennas, df loop. Injected plastic doors are available, but are very thick indeed and best left off. The vacuform canopy is what makes this a V9. It is very small and thick so much of your fancy interior cannot be seen. Once the kit was assembled, it was painted overall 76 with 75 squiggles all over the upper surfaces. This kit has the best mottle job I have ever done. A shame to waste it on a less than perfect kit. I added baremetal foil to the gun access panels and the fronts of the engine pods. Anyway, the Propagteam decals are really very good and fit beautifully.
If you have experience in multi-media kits and can overcome the fit problems, give it a try. I haven't given up on MPM as I have another of their kits currently in work. MPM is successful because they choose subject material that a mainstream company would not touch. Thanks MPM.
Resin
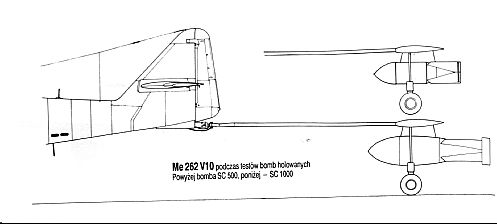
This is the version with the towed SC500 or SC1000 with a wing above the bomb on a two wheel trolley . There is a kit giving this little conversion but the price was astronomical so I am yet to see this.
MPM

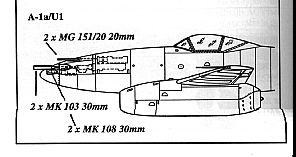
Me 262 A-1a
his is the standard plane for the Revell & Hasegawa kits as mentioned above and carried 4 MK 108 30MM cannon . It could also carry two bombs at the front ( supplied in both kits ?? - Revell one ) or two W.Gr (Waffen Gerat ) 210 rockets. These were 210 mm diameter rockets carried in much the same position as the bombs . Aeromaster and similar have decal sheets with these on . The W.Gr 210 rockets and tubes are available from AV Resins as a set . They also have sets for the more well known carriers like the Me 109G and Me 110 . These unguided rockets were very destructive on Allied bombers but slowed the carrier aircraft down , in the case of the Me 110 this could be fatal when attacked by Allied fighters. Mounting them on a Me 262 in this case seems logical given their speed advantage. Sources for AV Resins are NKR Models , Silverbird , Hannnants or Aviation Usk - see my Links page.
|
|
 |
This is the dedicated fighter bomber version with only the outer MK 108's retained and the inners removed . This comes in the Hasegawa version and probably the Revell version.
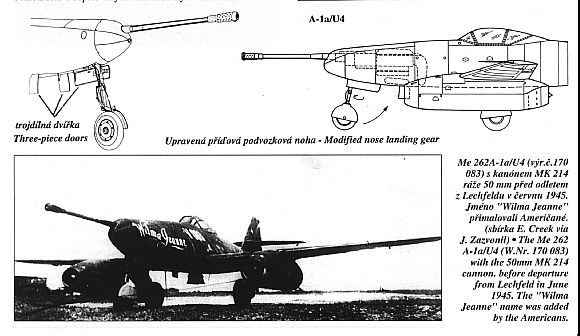
This is the dedicated target bomber version and can be distinguished by the modified nose section allowing a bomb aimer to lie in the nose section. There were only two examples ever built with production versions to be named A-4's. The Mistel version was to have a A-2a/U2 on top of a tired airframe with the canopy section faired over as below with a launch trolley underneath. I have found both these kits rather average in fit and they still lie in the back of my cupboard half done . I'd love to see a finished one and maybe one day it'll be mine.

The airframe for this version was not modified a lot . A bigger canopy was fitted , a fuel tank deleted ( replaced by 2 at the front where the ETC racks for bombs were ) and a second seat and instrumentation fitted as appropriate . The B-1a trainer is well kitted by the Hasegawa and Revell versions as well as an earlier Heller version with raised panel lines ( and reboxed for SMER ) . The B-1a/U1 nightfighter only differs in adding radar and different instrument for the radar operator and the seat being further forward in this version as depicted in the Hasegawa kit ( ? Revell ) In the U2 version this space was occupied by a fuel tank . The radar system is the FuG218 Neptun one . The signal flare holes ( Hasegawa ?REvell) on the LH fuselage just behind the cockpit are correct for the nightfighter version but should be removed for the trainer. According to the MBI book there should also have been a rear facing antenna . On the Hasegawa kit this is omitted but the support arm is included as well as an instruction to remove this in the trainer version - Puzzling !!!
There are a couple of conversions out there, Airmodel gives you a new fuselage with your option of internal or exteranl radar antennae and Unicraft, under the designation Me-262TP, does the 'B-2 with the DB-021 engines. Unicraft also has announced a conversion from the Special Hobby "HG III" version of the night-fighter to the "HG II" version (podded engines with highly swept wing)>
The main one of these is the B-2a . This involve inserting a 1500mm plug in the middle of the fuselage and a new shorter canopy .Better radar , Schrage Musik guns and better engined versions were planned for later on . More on these later.
This is about the point where various books naming of versions starts to send you batty. I will nominate all alternatives that I can find and their source.
C = Czech , the MBI book
P= Polish Monografie ( 2 parts )
J=Japanese - Bunrin-Do
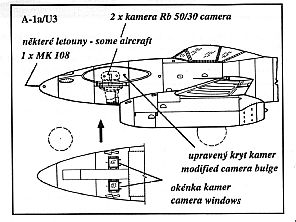
Me 262 Aufklarer I - see Schnellbomber I
The same body as the Schnellbomber I with a nose fuel tank replaced by two Rb 75/30 cameras.
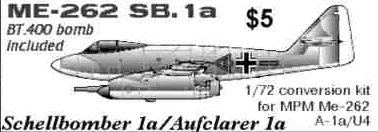
Me 262 Aufklarer Ia - see Schnellbomber Ia
The same body as the Schnellbomber Ia with a rear fuel tank replaced by two Rb 75/30 cameras .
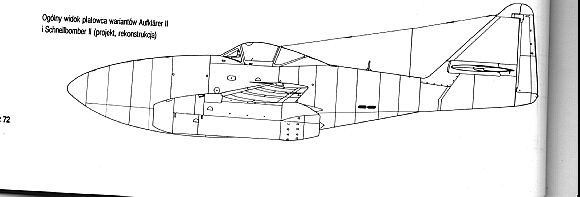
Me 262 Aufklarer II - see Schnellbomber II
The same body as the Schnellbomber II with the bomb bay
replaced by
a fuel tank and two Rb
75/30 cameras and one Rb 20/30 at the extreme nose .
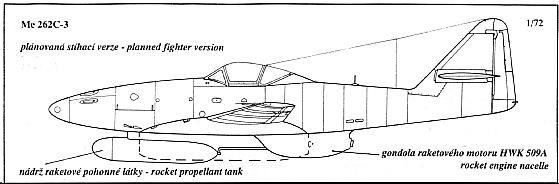
Me 262 C ( Abfangjager )or Heimatschutzer ( Interzeptor )I & II & III
This was a day point interceptor designed to get up at American planes ASAP and came in a couple of versions.
The C-1a had normal Jumo 004's with a HWK 509 rocket mounted in the rear of the plane with a cut off tail ruddr to accomodate this . This would be relatively easy to duplicate with some tubing and a copy of the tube from a C-2bkit. Diagram P24 Czech book.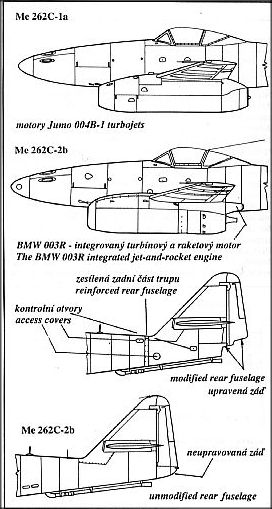
Me 262C-2b Toad Resins or now from Final Touch
( Polish- C-1b) This is a relatively easy conversion to give 2 new BMW 003R's ( rocket above jet )engines , 2 RATO units , engine onions and a tube at the back . The moulding has a few bubbles in the Toad version but nothing major . A beginners conversion !
The Me 262C-3 (or 3A-P) is less easy with an external tank and
engine to scratchbuild. I think a
conversion kit one day would be desirable .
Me 262D
According to Warbird Tech this was to have twelve rifled barrels firing a 50MM RX 73 rocket upward into a B-17 belly triggered by the bombers shadow .The recoil was to be balanced by counterweights fired at the same time . A similar system was tested on the Me 163. Duplicating this would really be a guess.Czechmaster - Resin
William Moore
This looks a lot like the HGIII but a lot bigger. The main body is cast as one piece . Seperate exhausts and intakes are included but the inlets are not deep enough . At least the lips are seperate allowing you to dig deeper without gouging the front part. Getting this right though will still be problematic but could be doable.
The parts are well cast with fine panel lines but the small parts need a bit of flash cleanup. The main body has a mould line and the cockpit area has a reasonable level of detail . Given the large canopy area though , more detail will be needed eg throttle quadrants , I would suggest typical details of A He 219 or Me 110G . Should look good when built up.Special Hobby 1/72 injection
Chris Clifford - SAMI v.3 no.3 Mar 97
The Kit:
This little beauty was a fair departure from the 262 most of
us are
used to. Radical changes were
relocation of the engines from under the wings to each side of the
fuselage, and the main
undercarriage was moved under the fuselage. Lastly it gained extra
length due to a third crew
member and internal radar. The design was put forward in February 1945,
but was abandoned
due to a projected high wing loading. This was proved short-sighted by
American designers, as
the Grumman Cougar was very similar and gave stalwart service to the US
Navy. The kit itself is
moulded in pale gray, slightly soft plastic, and my example had not a
shadow of flash anywhere.
Surface detail is finely moulded with engraved panel lines, and is
better than some kits costing a
lot more. Detail in the 'office' is far from astounding, but a nice
touch is the brass fret which gives
you seat straps, rudder pedals and aerials. Oddly enough, you only get
two sets of straps --
obviously the radar operator was a tough guy and didn't need any!
(I noticed the same shortfall of seat straps in Special Hobby's Bv 215.02 (for 2 crewmen rather than 3), but it doesn't really matter, since the same Eduard Air Project brass fret appears in every Special Hobby kit I've bought. Assuming that this is standard (it may not be) each single-seat fighter yields a spare set of straps for something else. Peter Morwood)
Instructions:The sheet is very clear with colour suggestions right the way through and a multi-language history of the actual aircraft. A full plan view of all parts is included, as is a guide to decal placement. A nice touch is a paint table, showing numbers for RLM, Humbrol, Tamiya and what I presume are East European equivalents.
Construction:
Stages One and Two deal with the cockpit, which is very straightforward. Despite the brass goodies you can spruce up this area further by adding a throttle quadrant from plastic and sprue. You can go the whole hog by using items from the Cooper Details Radio and Radar set, which has some beautifully moulded control boxes and scopes. Slightly disappointing was the instrument panel as it's a plastic part. With a brass fret already included, a panel wouldn't have been too much trouble but having said that, the kit part isn't too bad. A third set of seat straps was soon added courtesy of a Reheat set. Once painted, the cockpit fits into the horizontally-split fuselage halves, but a really annoying mould stub on the upper half prevents a snug join. You will have to get the file on this or the bathtub will not fit properly. I would also recommend you give both halves a rub on some abrasive paper to get a smooth join, as the inside texture is quite rough. The fit of both halves is good, with just a tiny overlap at the rear end, but it's easily removed with a file and wet-and-dry. Stage Four deals with the nose, tail and wings, and again things couldn't be easier. Just a glance at this aircraft screams 'tailsitter', and the instructions confirm this, but don't tell you how much weight to use. I erred on the cautious side by gluing in seven or eight BB-size lead fishing weights. There is plenty of room for this, but don't forget to glue the wheel bay in first! One area you might want to spend more time on is the air intakes, as they are blocked off by sections on the two fuselage halves -- the only problem is, they're too close to the opening and look very... well, blank! If building another, I would be tempted to cut away the kit plates, fashion new ones from plastic card and glue them further back. Engine fronts can easily be made from scrap sheet and tube. Take care when joining the nose and tail sections -- the more attention you give, the better the join and the less filler will have to be used. The wings are a doddle, but like the fuselage halves I suggest you give the inner surfaces a rub over with wet-and-dry. The good old abrasive paper comes in hand yet again for the trailing edges. These aren't the thinnest I've seen, but a little effort will bring better results. By the way, Stage Four tells you to fit the canopy, but I know you'll all wait and leave this to the end... It's best to cut the vacuform canopy out and paint or airbrush it separately. The final stage sees all the 'dangly' bits fitted, like undercarriage, doors and aerials. You may be happy enough with the doors, but I thought them rather thick and replaced them with plastic card using the kit parts as templates. The end result looked a lot more realistic. As for the undercarriage legs themselves, they also seemed very thick but some careful scalpel and file work easily reduced them. Then came the canopy, which I masked with Micropore tape and airbrushed. It slots into place easily enough with thinned white glue. The brass radio mast and D/F loop are best fitted with cyanoacrylate after all the painting or airbrushing has been done, as they are very delicate.
Colour Option:
I primed the kit with Humbrol 64 Matt Grey as I find this a good neutral colour, then the main camouflage was airbrushed. Although the kit is a 'What If?', Special Hobby recommend one of the standard Nachtjäger schemes, used by twin-seat Me-262s, Ju-88s etc: RLM 76 over black undersides. The top surface has a swirly pattern of RLM 75, all paints coming from the Xtracolor range. There are plenty of good books available for examples of night fighter schemes. The nose cone was painted white, as this would have been a dielectric surface which wouldn't interfere with the radar. Undercarriage bays and door inner surfaces were coated with RLM 02. Once the decals were placed, I sealed them with a coat of Xtracolor matt varnish.
Decals:
The sheet is excellent quality, printed by Propagteam. White crosses and swastikas are supplied, along with two full sets of numbers from zero to nine, allowing any code combination. Fuel grade markings also feature, but my favourite is a cracking little rendition of the badge used by the Nachtjägerverbände (night fighter units). With the use of setting solution, the decals look painted on.
Conclusion:
I'm sure I was a night fighter pilot in a previous life, so I
was
delighted when this little baby fell
into my hands! The east European companies seem to have cornered the
market for the more
unusual Axis types, and this superb kit is a welcome addition.
Excellent value, and it should grace
the collection of any Luftwaffe or 'What If?' addict. ( Czechmaster did
a resin kit of this plane and
for my money I'd always rather a Czechmaster resin than a injection
moulded Special Hobby kit ,
far less clean up & fitting work - get one from Aviation Usk or
Hannants - William )

Me 262E
According to Warbird Tech this was to have a rack of 24 R4M rockets under each wing ( It's only 12 in the Hasegawa A-1a kit ) as well as 24 in the nose of the a/c . This would have been an incredible bomber destroyer. Apart from the nose stuff this would be easy to duplicate but I've never seen any drawings.
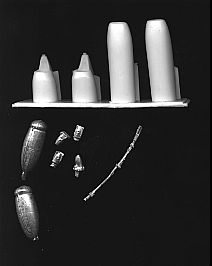
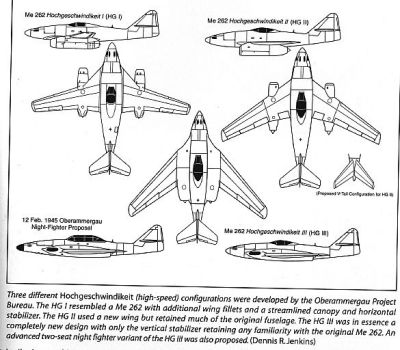
Me 262 HGI - Unicraft - Resin
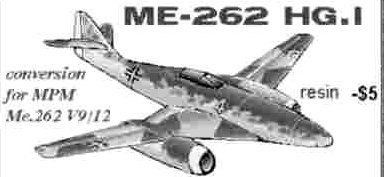
This is the alternative designation for the V9 according to the P book but Warbird Tech states it is a further conversion of this airframe . Warbird Tech (page 83) shows it similar but with an extension from on top of the nacelles to the nose just behind the gun bay . Unicraft offer a conversion kit but a little cutting and some plastic sheet would duplicate this.
Me 262 HGII
The difference to the HGI is a more swept back wing and a
butterfly
tail . I know of no kits for
this.
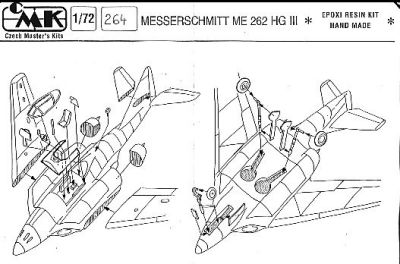
Me 262 HGIII - Czechmaster - Resin
 |
|
This plane differs as shown below in the instruction sheet . Mine
seems to have a massive bend in
the tail but this may just be poor storage on my part. The kit is
pretty good standard Czechmaster.
The only disappointment is the intakes are not fully carved out I can't
see any easy way out other
than posing the finished kit at 45 degrees so that these are not
visible. Well worth buying for your
ME262 collection.
Me 262 HG3 - Special Hobby - Limited Run Injection Moulded - 1/72- John Clarke
This was the night fighter version of the Me 262 HG3 design. Designed in February 1945. This design like many others fell into Allied hands at the war’s end.
This kit is of the standard Special Hobby multi media short run injection moulded plastic construction kit. It comprises 2 spruces of injection-moulded parts, a generic PE fret, a single vacuum-formed canopy, decals & instructions, all packaged in the normal light cardboard box.
All the parts are of the standard one comes to expect from Special Hobby, there is some flash on the plastic parts but not as much as is evident on some short run kits. Construction is straightforward and starts with attaching the PE straps to the seat.
One thing should perhaps be noted with the generic PE fret supplied with this kit. It has enough seat straps for 2 seats! This is not a problem if you have made one of the single seater’s by Special Hobby (you will have a spare set). Otherwise you will have to make your self a new set for one of the seats.
The rest of the kit goes together like a dream with no gaping joints requiring filling & sanding.
This kit is a tail sitter & extra weight needs to be placed in the nose to balance it on its undercarriage, I use lead shot glued down with super glue.
Adequate painting instructions are provided in the instructions for the un-adventurous, I did my Me 262 HG3 with folding wings & armed with a couple of X-4 missiles as an all weather fighter at sea in 1946!
Available from
- NKR models in Australia
- Hannants in England
- Squadron mail order in the USA.
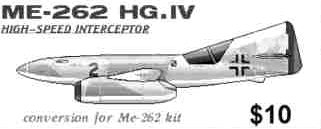
Me 262 HGIV - Unicraft
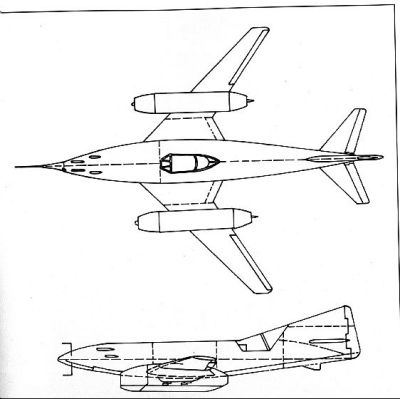
The only drawing I've seen of this was in Warbird Tech ( upper view only page 81 ) which shows a stretched fuselage with small wings and large long engines . Steve Malikoff has this kit I believe. As John Clarke correctly points out for some reason the upper and lower diagram do not match with the side view showing the wings as much straighter . Personally I'm waiting for the Classic Publications book to sort this out. If anyone can get close to the truth it will be these guys.
Me 262 (HGIV?) unknown Conversion Kit - Linzi Mumford
Known from side view only, canopy in fin like Li P13a
Material - Unicraft resin fuselage halves, Vac canopy, best to use Revell Me262a as donor.
Construction - Halves fitted together well and Revell interior detail fitted with much thinning of walls again. Massive nose weight needed and lots of dry fitting to fix the Revell wings and nose wheel bay. However, using this donor means that you keep the lovely Revell detail and this makes it a winner! Canopy is a beaut and shows the interior a treat so go to town on the superdetailing.
Finish - easy as pinholes are all on the inside of the fuselage and panel lines are very clear and match the Revell ones in depth.
Conclusion - a very satisfying build and a Trophy winner if you put a bit extra into it, mine is!
Here's Linzi's final effort so you can see what she means.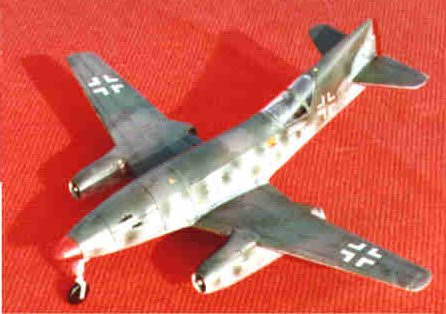
Me 262 Lorin Ramjet - Toad Resins or House of Hobbies ( now - 99 )

This is again a basic conversion . The Toad original had two big pieces of resin in which were fitted two brass pieces . These have to be cut off 5 mm from where the resin and brass meet . This will be the scary part to get this as close to straight as possible . The lead weight nose section for this is to avoid a tail sitter ( a nice thought this ) and the only other two parts are the back part of the engine. I would guess a fair bit of trial fitting will lead to a good conversion and it'll certainly stand out. The white metal parts are of average quality but the resin is fairly good with a tiny bit of sanding required . The ramjets were to provide additional power to the normal jets but would have required the jets to attain a certain speed before becoming useful. I am advised by Frank Henriquez that 12 Squared also did a version of this but I think the Toad version would be better.
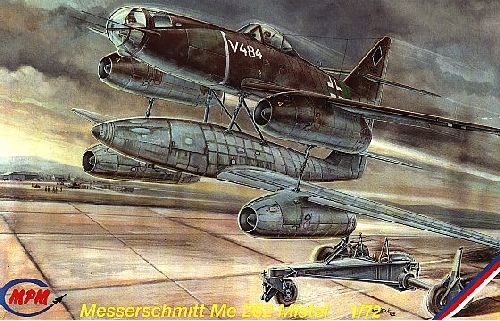
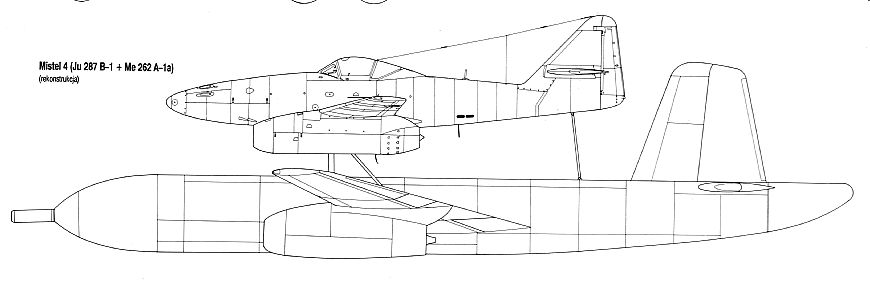
Me 262 Mistel 4
This was to be a Me 262 A-1a mounted on top of a Ju 287B . The Polish book has a clear side view which shows the Ju 287 with only 2 jet engines and and a contact fuse nose . You could possibly use the Huma kit but some heavy work would still be left
( Page 41 part 2 )
Below is a completed one from the Unicraft website.

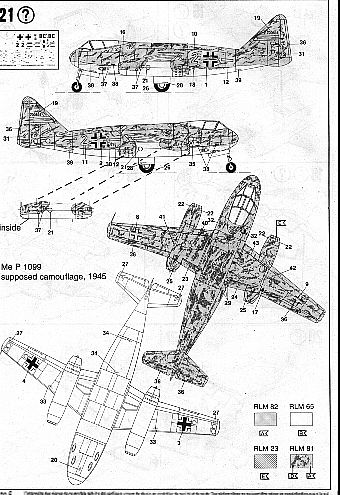
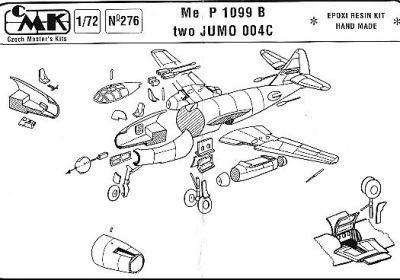
Messerschmitt P.1099B Czechmaster 1/72 Resin
The 1099/1100 is another one of those confusing Luft '46 conundrums . Revell's 1099 seems to duplicate that in DDL except for having 1 man not two , though the kit does have room for a second seat in the cockpit. The Polish book calls it a P1100 ? Why .
This kit is for a Zerstorer vesrion with a rear gunner controlling 20/30 MM cannon by their size and two remote control barbettes a la Me 210 . On the kit these are fixed in place . It was also armed with a forward firing MG. According to the Japanese book there were three crew but the kit depicts only two. The moulding is earlier Czechmaster with a few more mould lines , air bubbles and flash than the perfect kits we are used to . This means it's a bit worse than a Planet kit but I'm really just nitpicking here. Very doable and a good kit will result . Plenty of lead needed in the nose section though.
I believe Revell may be planning to release this version in plastic later in '98 so I'd hold off till then before buying this kit.Revell 1/72 injection
Mike McEvoy - SAM v.18 no.12 Feb 97
|
|
|
This design was a development of the Me-262, with the engines, wings and tailplane married to a new and bulkier fuselage to produce a longer-range Zerstörer. Just because it wasn't actually built hasn't stopped Revell from investing serious money in excellent tooling, in what I would have thought was a considerable step for a major manufacturer. I know that there are those among us, myself of course included, who like these might-have-beens, but I'm intrigued to find that Revell think there's a real market.
The kit is very well thought out and produced in dark green
plastic.
The cockpit has side
consoles and an instrument panel with raised and engraved gauges, and a
single seat with harness
and a three-piece perforated support. This is the only point at which I
take issue with Revell, as
Volume 3 of Nowarra's Die Deutsche Luftrüstung 1933-45, for me the
standard work on the
subject, maintains that it was a two-seater; which given the German
habit of putting two or even
three into heavy fighters' cockpits does seem more likely even without
a radar fit. The absence of
the second seat does, though, leave room for weights in the back of the
cockpit to stand the
model on its undercarriage.
(Luftwaffe Secret Projects makes the same suggestion about
crew
numbers (2), and a kit review
in the German magazine Jet und Prop March-April '97 features photos of
a Nachtjäger conversion
with an extra seat and a FuG 244 'Bremen-0' radar dish in place. Ingolf
Meyer's illustration of the
heavy-armament P.1099 suggests a crew of 3, two side-by-side and a
third facing rearward to
serve the cockpit and fuselage gun barbettes. This is another
conversion waiting to happen. Peter
Morwood.)
Each nacelle has a front face of its Jumo 004 moulded into its
intake section, and the
characteristic cone that fits into the tailpipe. The completed nacelles
fit snugly to the wings, and it
was a feature of the kit that nowhere did I need filler. Both nose and
main undercarriage legs are
supplied with retraction jacks, and there is an adequately realised
detail in each well.
Undercarriage doors are supplied as single pieces to enable the model
to be easily completed with
the gear retracted, though I wonder, particularly with the absence
these days of the stand which
used to be a standard part of any kit, if any models are finished this
way.
(Some still are. Mine. Model tanks look OK on a shelf or a
base, but
I prefer my 'planes to 'fly'.
I've had a standard pattern of wooden bases made by a local
wood-turner, and the models are
supported by curved, polished heavy-gauge wire to the same height, same
curve, same size of
base, though with a recess for a weighted plug in the case of heavier
than usual aircraft. This may
not be to everyone's taste, but I like it: it makes a handsome display
on a bookshelf with my
Luftwaffe reference books above and below. After all, modelling is
supposed to be fun, and
constant yapping between self-appointed 'experts' in Scale Models and
Military Modelling is what
put me off the hobby for so long. The slightly defensive tone at the
end of this review makes it
only too plain that such nonsense still goes on. Wonderful... PM)
Two suggested colour schemes are given with the instructions,
one
with an RLM 82/83 mottle all
over its upper surfaces and the other, which I picked, with segments of
the same colours and
mottling on the fuselage sides. For this, decals are included with the
3U code of ZG.26.
Individual codes are BC, with the B is blue; this colour, according to
the Kookaburra Luftwaffe
Camouflage and Markings, would normally have been applicable to
Geschwaderstab aircraft, and
the C to II Gruppe, but it is possible to argue that these 'rules'
would have been flexibly applied at
the end of the conflict when this aircraft might have gone into
service.
I realise that this is the colour-scheme equivalent of 'micrometer reviewing', but I mention it to avoid correspondence from those who take these models as seriously as I do. There is a good and convincing selection of minor markings on the decal sheet, though swastikas have to come from the modeller's own resources and the ZG.26 badge on the nose was liberated from a Superscale Bf-110 sheet.
This really is a very good kit, though I know those who will regret that the effort put into its construction was not put into a kit of a 'real' aircraft. Perhaps the fact that I have plans for at least another two, both with a second seat and at least one with radar, will encourage its producers, and I hope that other modellers that are interested will support it equally. And wouldn't it be good if we could persuade Revell GB to sponsor a British equivalent?Revell- Injection Moulded - 1/72
Dan Johnson

What you have is basically the original Revell Me P.1099 kit (only this time moulded in light grey plastic....YEA!). There is a small sprue of parts for the guns, and this clever little nose extension that fits over (slides around) the existing kit fuselage's nose, which contains the front gun, which is designed to move side-to-side and up and down. I wonder how well this will really fit? There is also a new canopy, and now that I look a little closer, a few tiny changes to the fuselage halves, and part #12 (a semicircular bulkhead) has had some detail added to it. Of course, new decals for two aircraft are included....
Unicraft does this also but obviously the Revell one is the choice.
Me P1100 A - Unicraft
This is the offset canopy version of the P1099 and is offered as a cheap variant for those who want to make every 262 possible .
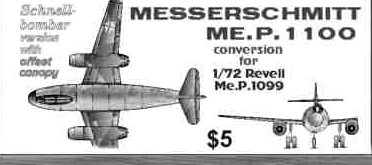
Me P1100B - Airmodel
 |
 |
It's labelled as with two He S011A turbojets . Basically it's
similar to the Revell 1099 except that
the wings are more swept and the engines are buried in the wing root.
Rough comparison to the
Revell P1099 shows the bodies as virtually identical with both slightly
bigger than the
Czechmaster P1099B . This is typical Czechmaster / Airmodel even down
to the usual diagram .
Airmodel kits are distinguishable by the reverse side having some
comment on the history of the
design. Nice panel lines, a little flash and the usual circles of
small parts. As usual the tail sitter
problem will occur but the engine intakes/exhausts aren't bad. Go out
and buy one from Aviation
Usk or Hannants.
Me 262 Schnellbomber I
This change was only to delete the cannon and replace with a
fuel
tank as well as one at the rear.
Additionally the engines were to be Jumo 004C's with small RATO units
to assist in takeoff. The
aim was to carry a greater bombload of up to 1000kg including a BT700
(AV Resin) offset to
the left (from front.) This would be very easy to duplicate , the
only difficulty being the RATO
units (See the Classic Publications book Vol 1 P 127.)
Me 262 Schnellbomber Ia
Arba
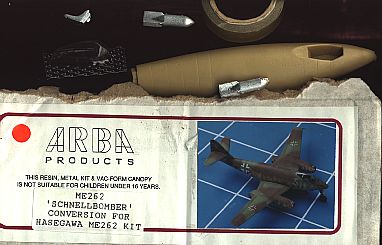
This version moved the pilot forward to get more fuel capacity for the fast bomber concept. Powered the same as the I but with a new body . A similar bombload to the I was possible but 4 RATO units would be required due to the much greater fuel load ( near 5000 litres vs. 3000) Two MK 108's were supposed to fit in the nose also .
The Arba conversion is pretty basic as it's only a new fuselage , canopy , 2 metal bombs ( I'd use the Kendall ones myself ) to avoid tailsitting and a new seat. The only work is to cut off the tail from the cut and reattach to the Arba body , oh , and sand and fill the pinholes and a bit of mould line.
I think the hard part will be finding this kit . Arba are difficult to get even for new kits but this is at least 3 years old.
Unicraft
Unicraft also make a version of this and this should be obtainable
from NKR Models - it seems a little cheap to me so don't expect high
quality on this one.
Me 262 Schnellbomber II
This plane was the same as the standard Me 262 except for a
new much
deeper fuselage and
larger tail to compensate for this. It looked rather big and fat for
this reason . The bomb bay was
now internal in this deeper fuselage . Bombload was much the same as
for the previous
Schnellbombers. There is no kit for this so serious scratchbuilding
would be required.
Me 262 with X-4's ( X-4's NKR Models )
A simple modification by adding these as an alternative
armament .
This is shown in the Polish
book but is logical given this AAM was intended to be used ASAP.
Me 262 Turboprop
Unicraft
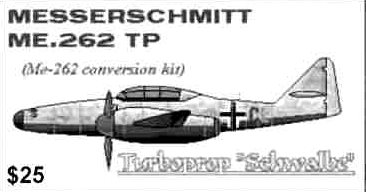
This is an interesting version - hopefully you could also graft this onto the Ar 234 to produce it's turboprop version.
Kim M.
Me-262 turboprop. Fuselage, engines, props, canopy provided. You must provide interior, wings, and landing gear. The props look OK, but could probably use a sanding. This uses the DB021 engine, and the instructions imply this was a test bed to the planed Arado 234TP. The engines mount differently, but I imagine with some puttering, you could adopt this to the AR-234.Me 262 W
|
|
|

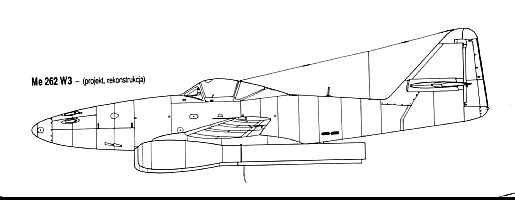
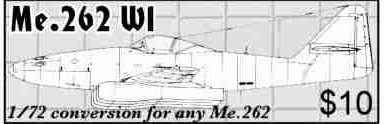
The two in the Polish book on pages 38 and 39 are standard Me 262
A-1a's except for the
powerplant. This was to be either 4 (W3) or 8 (W1) pulsejets . Those on
the W3 are bigger in
diameter with longer exhaust pipes . A possible way to do these is to
get some spares from the
Huma He 280 and use these . The He 280 pulsejets appear closest to
those of the W1 but still
short in the pipe length and you'd need two He 28o kits . Possibly the
4 version ones might be
closer to those in the Dragon AR 234 kit but You'd still have to cast 4
copies . Personally I think
with even 4 pulsejets the plane would have vibrated apart within a few
missions at most.
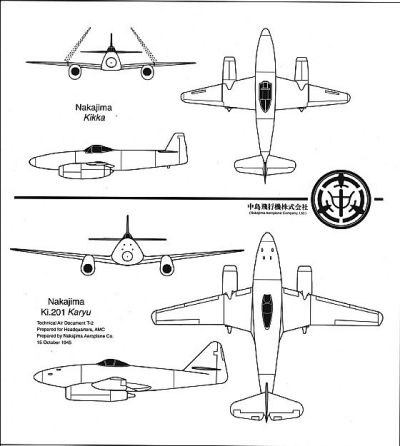
Nakajima Kikka
MPM
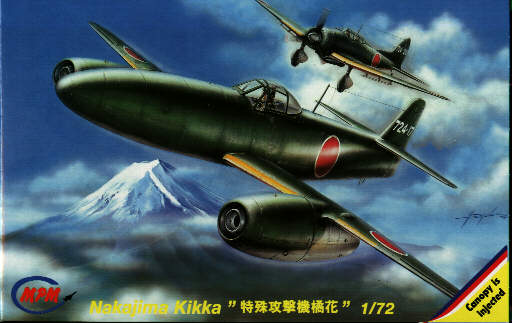
The Kikka looks fairly similar to the Me 262 except the engines project further forward on the wings to the extent that only the exhaust onions are behind the wing , The other difference is the outer wing panels are at a lesser dihedral than the inner unlike the 262 which are constant .
I surprised myself with this one . I'm going to have to now refer to early and late MPM. I've done MPM kits in the past like their Seiran, Me262 & Ki 64 with varying degrees of success. Earl at NKR keeps telling me they've got better but I've avoided finding out. I got out the main body and wings and did a quick test fit and to my surprise they do. They've still got largish sprue gates and a bit of flash around the parts but this I can forgive if the fit is better. The whole kit comes on one sprue and includes a canopy which rattles around the plastic bag . There is the usual nice etched brass details for the cockpit area including throttle quadrants as well as the U/c. The decals are reasonably well in register and the instructions are certainly clear . The painting instructions are quite clear and quote Aeromaster acrylic colours which is quite handy for me . They also show FS & Humbrol colours .
I'm looking forward to doing this kit .
Got it but haven't built it. Moulding looks pretty good: excellent *very fine* engraved detail. Minimal flash. Gear doors are a bit thick, but no more so than on many kits by more "mainstream" manufacturers. No detail on insides of doors. Main gear wells are empty - but at least they're boxed in (nose gear well isn't). Canopy is injection moulded and is pretty average in quality - not too cloudy, not too clear, not too thin, not too thick. MPM now has smaller/narrower gates that make parts removal & clean-up easier, but they have more of them! (Engine intake and exhaust cones have four gates a piece - for parts with a diameter of only about a centimetre). Landing gear is pretty unremarkable but not too thick. The kit comes with the obligatory photoetched fret, which includes cockpit side consoles, landing gear details, seatbelts, rudder pedals, and an instrument panel with film backing.
Obviously, I don't know about fit yet, but as usual, there are no locating pins so you're on your own. Decals are supplied for the prototype machine, plus a hypothetical aircraft of 724 kokutai. Hinomarus seem in register and dark enough.
Looks to me like it might build up fairly nicely. Looking
forward to
doing this one... (gonna look
nice next to the 262s and the Su-9... gotta get one of those RS Karyus
one day...)
Nakajima Kikka K - RS Models - Resin
This is the trainer version - review later.
RS Models Ki-201 Karyu - Wulf Corbett
Well... it's a Me-262 with slightly less swept wings... This takes resin moulding to it's peak so far. Fuselage halves are fully hollowed and thinner than most injection moulded parts, with cockpit interior detail moulded in. Wings are in one solid piece, which makes the wheel wells a bit shallow, but the nosewheel well has interior, and overall it's a beauty, if simple. The usual white metal u/c legs, vac canopy (looking a bit rough) and simple decal sheet (just 6 hinomaru) are included. Nice addition to the 262 set.
Slight correction...
I'm not nearly so happy with the cockpit as I was before I
test-mated the fuselage parts. It looks a bit empty in there with just
sidewall,
panel, seat, stick and bulkhead (what else IS there though?). Some
floor texture would help.
Rs Resins - Resin - 1/72
Earl Martell
|
|
|

RS is producing very high quality resin kits...with full
colour box
tops, white metal landing gear struts and decals. The Ki-201 has a one
piece
wing (fine, engraved panel lines), two fuselage halves with cockpit
sidewall
detail moulded in, separate horizontal tail planes, separate engine
nacelles, reasonable wheel wells (certainly deep enough) and cockpit
(floor,
seat, instrument panel etc.), a vac form canopy, white metal landing
gear
struts and nose wheel... and a small decal sheet with six hinomarus (
which you may as well throw out immediately - William ). The
instruction sheet is very basic and there's no painting guide at all,
but at least it's in English.
Decals
All of the following have done these recently
Aeromaster, ADS, Superscale as well as others .
I recommend Avia Imports in England for these . This bloke seems to have a tonne of decals always especially Aeromaster. He always has a 2 page spread in SAMI and has an email address.
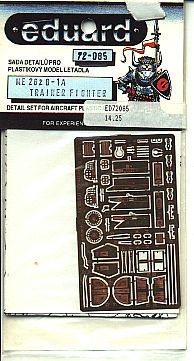
Eduard and Airwaves have done sets for both the day & night fighters . The Eduard sets are more detailed though . Airwaves does have the V056 detail set which is worthwhile. The best set is from Cooper details - brilliant resin and brass details for the cockpit and wheels but not cheap ! If you've got the dough buy one.
 |
 |
|
 |
|
CMK - 1/72
Earl Martell
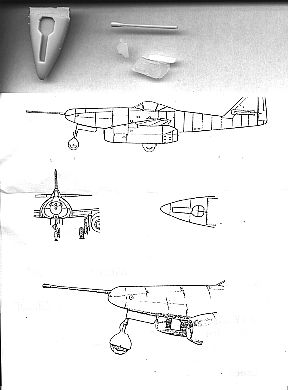
In 1/72 scale are 2x ME-262 sets at $10ea. One set provides a detailed engine and engine panels (one only), while the other set has a new nose with an open, detailed gun bay and thin resin panels that can be assembled open.
CMK is doing a Me-262A-1a/U3/U4 & -2a/U1 conversion set - Evan L. Mayerle
For all devotees of Me 262 versions these should be the best
yet .
NKR Models should stock these when they come out.
Books
The Classic Publications books are looking to be the best ever on this plane based on Vol 1. Cheaper alternatives are the MBI book or for lots of diagrams and pictures the Polish Monografie fit the bill (All in Polish though.)Monogram Me262 A
Frank Henriquez
This is a very nice kit despite its age . It has very fine raised panel lines , good surface detailing , Jumo 004 engine , a detailed gun compartment and cockpit and two figures. One minor drawback is the Monogram copyright embossed on the lower wing.....
Dragon DML - 1/48
Jamie Davies
They have moved their factory to Shanghai to take advantage of the cheap labour. And in some ways IT SHOWS.
They have dropped all the metal frets from the old kit. Some of the parts such as the DF loop have been remoulded in plastic while others, seat belts ,throttle quad, canopy release and jettison handle have just been left out. The wheel bay is now all plastic, still looks ok when painted and in place. The cockpit still looks good without those parts mentioned and I would have always used a brass set of belts over the old steel ones as you could never get the kit's ones to sit well.
The instructions are a joke and highlight what is now going on at DML .There is no historical preamble on page 1 about the aircraft as in other DML products just a pic and a graphic of the sprue layout. The rest of the sheet is the original Jabo instructions [you get all the decals for the Jabo with a sheet of white fuselage numbers for the aircraft you pick ,read, make up your own numbers] no wrk. no. provided. This may be correct as many aircraft of the time carried no wrk no. but it's just sloppy research if you ask me.
The instructions tell you to build the gun bay then fair over the gun ports with 4 new parts provided. They also tell you to fit the gun sight, not, and to paint the rear deck of the cockpit silver???????There is no detail provided of the camera bay, just 2 tear drop shapes to glue, on the outside of the gun bay. They are moulded flat on the bottom and take very careful sanding and lots of super glue and accelerant to make sit without gaps on the fuse. Its open to argument if they are too large.
The camera ports on the underside are just wrong [which pisses me right off as l wanted too enter this kit in the Out of Box section at the Expo next month,] They give you 2 round clear parts to stick on the bottom of the fuselage for the windows. No reference at all to the pilots bottom window. All my references show 2 square flush widows, they are way over scale in thickness too.
The canopy is molded in a thinner clear plastic but for my money is not as clear, mine has several imperfections and lots of scratches .The rest of the kit is normal Dragon stuff with one exception, a sink mark at the end of the fuse underside which was on all other DML 262 kits has been fixed, small mercy's. Mine has gone together with all the normal problems but is now about 1/2 sanded and looks good. The camera bay would be relatively easy to scratch build.
DML has other kits in this scale inherited from Trimaster , including a basic A , V056 , a single seat night fighter and the glass nosed bomber according to Frank Henriquez.
Frank Henriquez & Andres Valde
Hasegawa has a beautiful - if somewhat dated - version of an Me 262A . Revell has or had four an Me 262A ,Me 262A-1a/U3 - reconnaisance , Me 262B-1a/U1 and a V056 ( BK 5 gun ) which is packaged by Revell Germany and is actually a reboxed Revell Me 262A with a new sprue with the appropriate parts. It involves considerable cutting of plastic , but the new parts are very nicely moulded. It may be easeier to buy this kit for the modification sprue and use the Hasegawa kit to modify. The Hasegawa kit has slightly thicker plastic and better fit with crisper surface detail. Andres informs me of the following other kits :- Nakajima Kikka by Z Model ( 80's)
Kika kits - 1/48th
Kika
Ventura
Jamie Davies
I have the Ventura kit and it is better than it first looks. However it is lacking in detail ie. cockpit, gear and so on - Jamie Davies
Ventura
Tom Zuijdwegt
I just bought the Ventura Kikka today at a aircraft meeting for about US$ 15.
Here are my first impressions:
The kit is injection moulded with fine raised panel lines. The moulding is clean but it has rather thick runners connecting the parts to the spruces. The form of the fuselage and wings looks alright in the box. There are some white metal parts (engine intake and exhaust, nose gear leg, nose gear door and control column. There are two vac-formed canopies which are clear and crisp.
Cockpit detail is sparse.
The instructions contain two small sketches detailing construction, some reproductions of photo's of the original and a brief history.
Tom ZuijdwegtRainbow 10
Mark Hernandez
I happened to be able to pick up 2 different versions of the Kikka from Rainbow 10 a number of months ago. Kit # FA-14 the Nakajima Experimental Navy Special Attacker "Shisei Kikka" and kit # FA-16 the Nakajima Navy Special Attacker Kikka. The only difference between the 14 and 16 kit is that the 16 has one bomb under the belly and a couple of RATO bottles, an antenna behind the cockpit and an extra set of decals for numbers on the tail. The 16 has an additional one page two-sided instruction sheet for adding the above items.
The mouldings are exquisite along the lines of Hasegawa or Tamiya and minimal flash. The cockpit is very nicely detailed and also detail moulded into the sides of the fuselage halves but no seat harness is provided. They give you a bolt and nut for the nose weight and a special mounting location on the inside part as part of the nose wheel housing. There's nice detail for the intake and exhaust areas for the engines.
The injection moulded canopy is very clear but not in a seperate bag as the decals are.
The instructions are pretty straight forward and easy to follow.
It looks like a fairly quick build but I have yet to open the plastic bags.
Mark Hernandez
Raccoon Models - 1/48 - Resin
Mark A Hernandez
If anyone is interested in the Raccoon Models 1/48 resin Ki 201 I can advise to steer clear. I just got mine from Aviation Usk. The features of the kit are nice. A dark grey resin similar to the one on the new SharKit Horten XVIII. The terrible part and biggest disappointment about it is they just took a 1/48 Me 262 and put on a Kikka tail and canopy. The rest of the body is the same length and width as an Me 262 and so are the wings and engines.