 |
| Manufacturers |
| Ar E 381 |
| Ar E 555 |
| Ar E 580 |
| Ar E 581 |
| Ar E 583 |
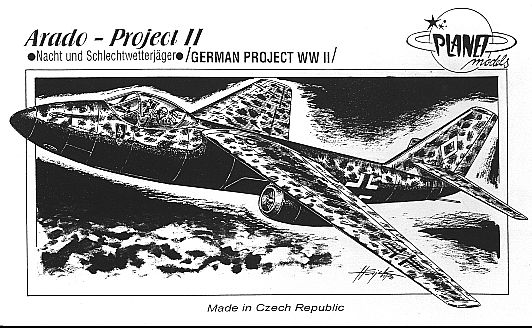
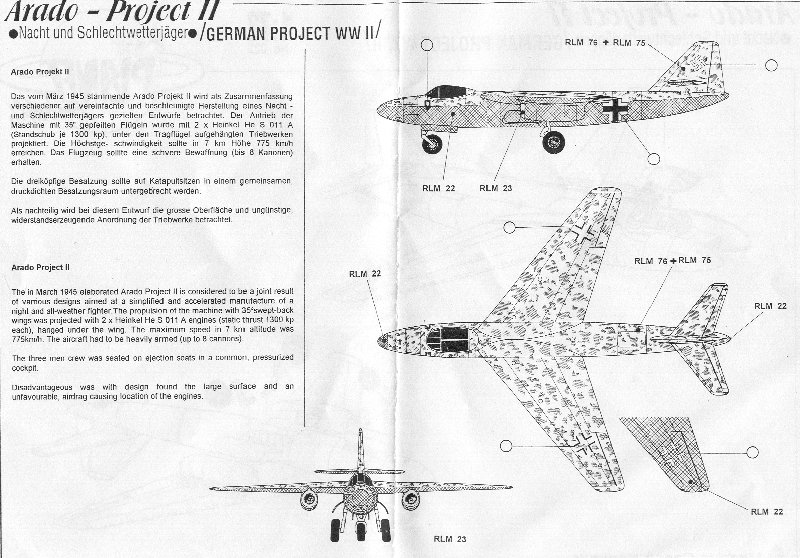
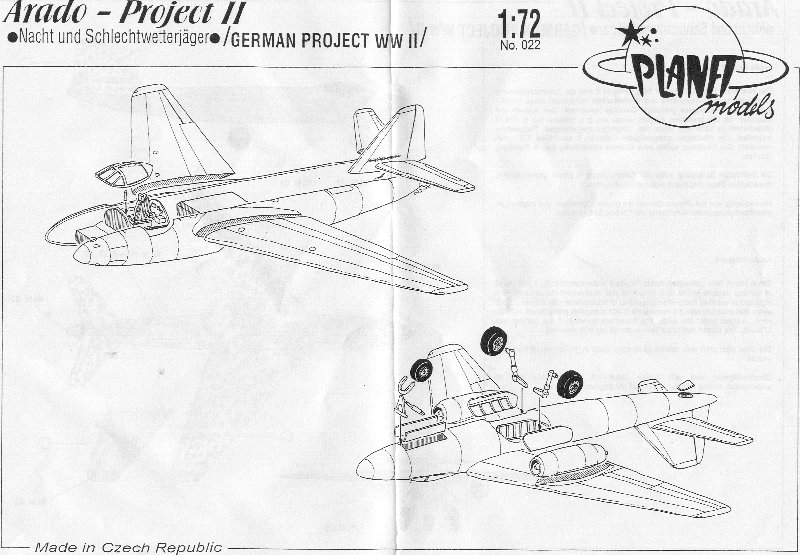
| Ar Project II |
| Ar TEW 16 |
| Home |
PLANET MODELS - $50 AUD
MARK HERNANDEZ - May '98
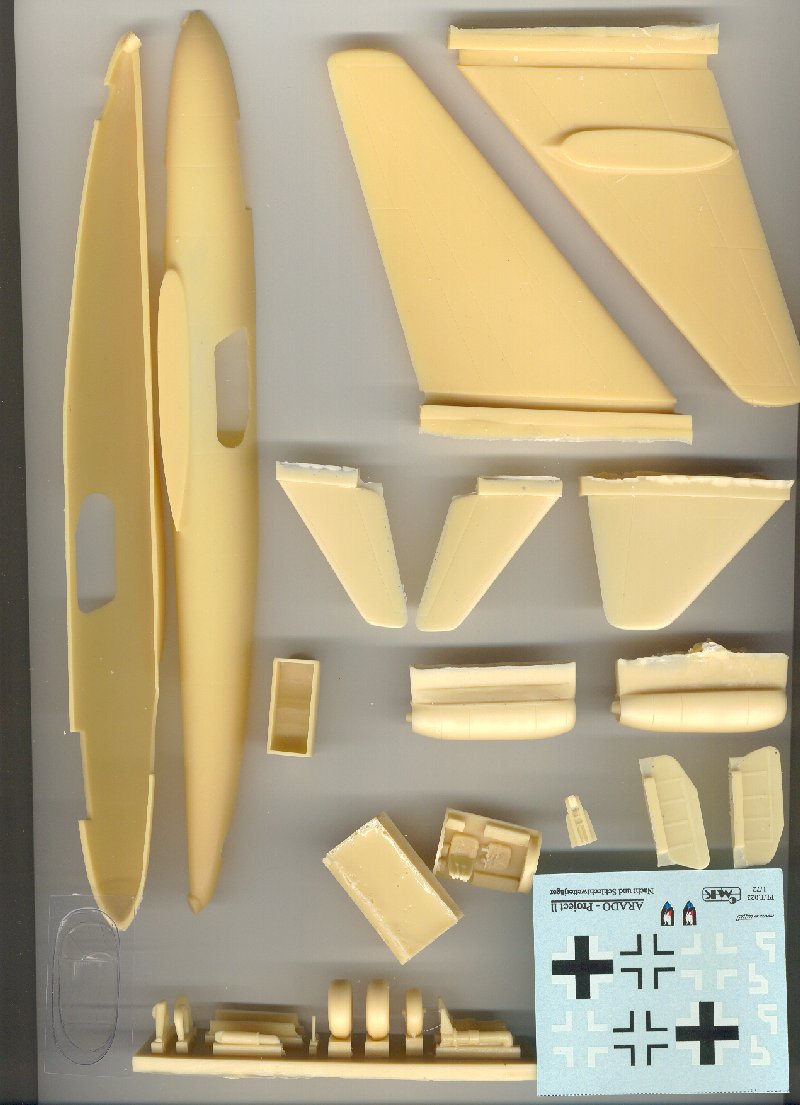
This kit is rather large for a 1/72 resin kit. It measures 8 3/16" in span by 9 1/2" in length. The main body comes in 2 hollow halves just like an injection moulded kit. If it wasn't resin you'd swear it was plastic injection moulded. The halves are thin with nice engraved lines and a minimum amount of flash. The mould retainers on the nose and tail are easily removed with an X-acto knife and sanded. There are no built in attachment points or retainers so you'll have to make your own.
The cockpit is a separate mould and includes the front and rear bulkheads, front and rear side facing seats, side consoles, radio gear and instrument panel. Per "Luftwaffe Secret Projects" this is supposed to be a 3 seat nightfighter but it only has 2 seats. The seats also look slightly oversized compared to other 1/72 kits Planet has put out. The wheel wells are separate pieces and thin with detail. The main wheel well on mine has numerous small holes in it because of it's thinness. You'll probably need lots of weight in the nose for this plane and there's plenty of room for it...... You'll need to drill out the 6 cannon ports in the nose; 3 upper and 3 lower.
The wings are a solid piece and are very thin at the roots where they are attached to the runner. There's no relief there. The runner is as thick as the root. Cut from one side with a razor saw. I ended up cutting into one wing when I thought I could speed up the process by cutting from both sides. A lot of sanding will be needed to clean up the cut and make it flush to the wing root. Metal rods will be needed for attachment and strength of the wing to root joint.
The engines are separate single pieces and feature a nice intake with fan blade and exhaust moulded in . Again care will be needed when cutting off the runner. The rear of the engine at the exhaust port is very thin. A good deal of sanding is needed to get the engine to fit flush with its mating surface.
The horizontal and vertical stabilizers are also solid pieces and the mould retainer is attached at the roots. Again, there is no relief there and care must be taken when they are cut out. There is no location marking for the attachment of the vertical stabilizer to the body so you have to go by the drawing as to the position. There are markings on the tail for attaching the horizontal stabilizer.
The main landing gear is thick resin and should probably hold the weight. The nose gear is in 3 separate pieces that will probably require some bracing to hold the weight. The tires appear to be bulged and flattened, the first I've seen in a Planet Model kit. The A/C is supposed to have a machine gun out the bottom portion of the rear fuselage. It's shown on the box but none is provided. They do provide a small access cover for it.
The kit retails for around $60 USD but you can get it through mail order for less.I'm just starting to do some preliminary work on this kit.
Looked
like a pretty quick build until I
got into it. The mould plugs for the main gear bay, nose gear bay and
cockpit tub were a bear to
cut off. The main gear center line divider had many air bubble holes
and was very thin. When I
tried to clean it up I broke it so I made my own center line divider
and rib structure. It was pretty
easy since it's all flat pieces. The front and rear bulkheads are also
pretty thin so I reinforced them.
I also cut out the main gear legs and was disappointed because the mold
attachment to the leg left
them flat on one side. It happens to be the side that faces out. I
would suggest that prior to
installing the main gear bay into the fuselage that all technical
aspects of attaching the legs and
any additional retraction gear that one may add be scoped out and holes
drilled so that when it
comes time to put in the gear there is no trouble.
The same goes for the nose gear bay. When you cut off the plug
you
need to sand it all the way
down to the top of the bay. It's rather tall and has a "hump" moulded
into it at the rear top portion
of the bay for the nosewheel. The reason for sanding this will be
explained in the next paragraph.
The cockpit tub was the most difficult. If you cut it at the
bottom
of where the front and rear
bulkheads are flat at the bottom of the mould the cockpit fits
perfectly in the fuselage. This was
probably about 1/2" of resin I cut off along the length of the cockpit
section. The problem that
you now have is that you can no longer put the nose gear bay in because
the bottom of the
cockpit section is still too long. In order to fit the nose gear bay
you have to cut off more of the
mould plug of the cockpit right up to the bottom of the cockpit floor.
That's about another 1/8" to
1/4" to cut. I said "forget this" and built my own front and rear
bulkheads and cockpit floor using
the existing mould as a template. They fit great except for one thing.
The nose gear bay still will
not fit all the way. What I had to do is cut out 90% of the bottom
portion of the front bulkhead
below where the cockpit floor line meets it. The front bulkhead now
fits over the nose gear bay
and the cockpit floor looks like it'll rest on nose wheel "hump" molded
into the gear bay (I hope).
This also means I'll need to scratch build the cockpit. I didn't like it anyway because it's suppose to be a 3-seater and not a 2-seater. The seats are also slightly oversized but they sure do look the right size from the pictures in LSP.
That's if so far over the last few nights. Stay tuned for
more.
Painted the interior and cockpit of the Arado Project II. Adding the throttles took some time and good eye work. I used a throttle quadrant from an He 219 and put on 4 levers, like an Me 262. All I have to do is give it all a flat coat and put the instrument panel in and it's done, sans ejection seats. Still working on those but they can go in last.
Also did the horizontal and vertical tails. Since there is no locating tab I drilled a mounting hole into the body and the vertical tail. I used some brass rod for the connector. Next were the horizontal tails, Again there are no tabs. A small scribed line is located on the vertical fin but I couldn't tell if this was for the center line or the bottom of the horizontal tails. Referring to the instructions and LSP I decided that if I used it as the center line they would be too low. So I placed the tails on and drew around the edges on to the vertical tail, picked a center point and drilled through the vertical tail. I made corresponding holes in both of the horizontal tails, attached them with brass rod and everything lines up great. They are all horizontal and perpendicular where they are supposed to be.
I then worked on the landing gear. Well I at least cut it off
the
retainers, which leaves it flat on
one side. That's when I noticed something strange. In comparing the kit
main gear to the side
view of the instructions, which looks like it came direct from GDL/LSP,
it is far too short by
maybe an 1/8"-3/16". The nose gear looks about the same way too. If you
follow the instructions
you'd end up putting the V-bar all the way to the top of the wheel well
when it should be toward
the bottom nearest the belly of the A/C. I was trying to decide how I
was going to correct all of
this. I put this all down and went off and did something else in the
meantime. I was looking
through the Aero Detail book on the Ar 234 and noticed that the L/G
legs were almost identical
to the Arado project II. I dragged out one of the 1/72 DML kits and
checked. Sure enough they
looked good but were too small also. OK, pull out the 1/48 Hobbycraft
kit now. Heh! this looks
like it might work! Too bad it doesn't have the detail of the DML kit.
 |
 |
 |